If you’re just starting with LangGraph and want to build real AI workflows using Google Gemini, this beginner-friendly tutorial will help you understand everything step-by-step. Once you understand the basics, continue with how LangGraph works internally to learn more about nodes, edges, and state.
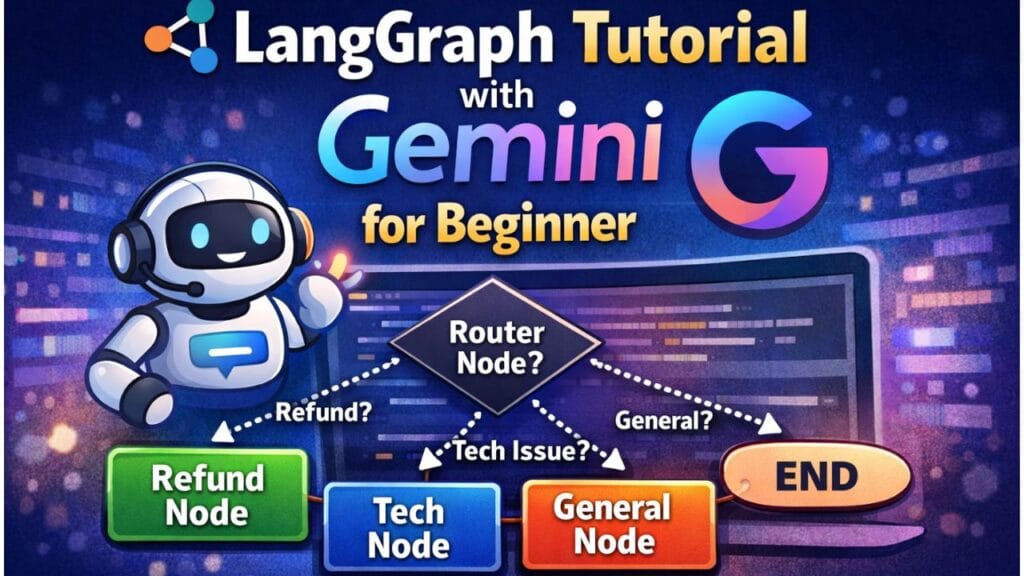
In this langgraph tutorial, we will build a simple multi-node LangGraph project where one node decides the route and the graph moves to different nodes using conditional edges.
✅ 3+ nodes
✅ Conditional Routing (If/Else Flow)
✅ Real-world scenario workflow
- ✅ What You’ll Build in This Tutorial
- ✅ What is LangGraph (Simple Explanation)
- ✅ Install Required Packages
- ✅ Setup Gemini API Key
- ✅ Step 1: Import Required Modules
- ✅ Step 2: Define the Shared State
- ✅ Step 3: Initialize Gemini Model
- ✅ Step 4: Create Nodes (Router + 3 Processing Nodes)
- ✅ Step 5: Create Conditional Routing Function
- ✅ Step 6: Build the LangGraph Workflow
- ✅ Step 7: Test Your LangGraph Workflow
- ✅ Expected Output Flow
- ✅ What You Learned (Beginner Summary)
- Source Code
✅ What You’ll Build in This Tutorial
We’ll create an AI Customer Support Workflow.
User queries can be of 3 types:
| User Query Type | Example | Route |
|---|---|---|
| Refund related | “I want a refund” | Refund Node |
| Technical issue | “App is crashing” | Tech Node |
| General question | “What is pricing?” | General Node |
So your graph behaves like:
Router Node → Refund Node → END
Router Node → Tech Node → END
Router Node → General Node → END
✅ What is LangGraph (Simple Explanation)
LangGraph is a framework that helps you design workflows as a graph, where:
✅ Node
A node is a step/function in your AI workflow.
Example nodes:
- Detect intent
- Generate response
- Validate output
- Summarize content
✅ Edge
An edge is the connection between steps.
✅ Conditional Edge
A conditional edge means:
“Go to the next node based on the output.”
Example:
- If intent =
refund→ go to refund node - If intent =
tech→ go to tech node - Else → go to general node
✅ Install Required Packages
Run this in your terminal:
pip install langgraph langchain langchain-google-genai
✅ Setup Gemini API Key
Linux / Mac:
export GOOGLE_API_KEY="your_api_key_here"
Windows PowerShell:
setx GOOGLE_API_KEY "your_api_key_here"
✅ Step 1: Import Required Modules
from typing import TypedDict, Optional
from langgraph.graph import StateGraph, END
from langchain_google_genai import ChatGoogleGenerativeAI
✅ Step 2: Define the Shared State
LangGraph nodes communicate using a shared state.
class SupportState(TypedDict):
    user_query: str
    intent: Optional[str]
    response: Optional[str]
🔥 Why do we need State?
Because every node needs access to:
✅ user input
✅ router output (intent)
✅ final response
✅ Step 3: Initialize Gemini Model
llm = ChatGoogleGenerativeAI(
    model="gemini-2.5-flash",
    temperature=0.2
)
✅ gemini-2.5-flash is fast and great for beginners.
Note: Model availability may change, so please use a currently available model.
✅ Step 4: Create Nodes (Router + 3 Processing Nodes)
✅ Node 1: Router Node (Intent Detector)
This node decides what the user wants.
def router_node(state: SupportState):
    query = state["user_query"]

    prompt = f"""
You are an intent classifier.
Classify the user query into one of these intents only:
- refund
- tech
- general

User Query: {query}

Return only one word: refund OR tech OR general.
"""

    intent = llm.invoke(prompt).content.strip().lower()

    return {"intent": intent}
✅ Output of this node updates state like:
{
  "user_query": "I want refund",
  "intent": "refund",
  "response": null
}
✅ Node 2: Refund Support Node
def refund_node(state: SupportState):
    query = state["user_query"]

    prompt = f"""
You are a refund support assistant.
User says: {query}

Reply politely and explain the refund process in 3-5 lines.
"""

    answer = llm.invoke(prompt).content
    return {"response": answer}
✅ Node 3: Technical Support Node
def tech_node(state: SupportState):
    query = state["user_query"]

    prompt = f"""
You are a technical support assistant.
User says: {query}

Give troubleshooting steps in bullet points.
"""

    answer = llm.invoke(prompt).content
    return {"response": answer}
✅ Node 4: General Support Node
def general_node(state: SupportState):
    query = state["user_query"]

    prompt = f"""
You are a customer support assistant.
User says: {query}

Answer clearly and friendly.
"""

    answer = llm.invoke(prompt).content
    return {"response": answer}
✅ Step 5: Create Conditional Routing Function
This function decides which node should run next.
def route_by_intent(state: SupportState):
    intent = state["intent"]

    if intent == "refund":
        return "refund_node"
    elif intent == "tech":
        return "tech_node"
    else:
        return "general_node"
✅ This is the heart of conditional edges.
✅ Step 6: Build the LangGraph Workflow
graph = StateGraph(SupportState)

# Add nodes
graph.add_node("router_node", router_node)
graph.add_node("refund_node", refund_node)
graph.add_node("tech_node", tech_node)
graph.add_node("general_node", general_node)

# Start from router
graph.set_entry_point("router_node")

# Conditional edges from router node
graph.add_conditional_edges(
    "router_node",
    route_by_intent,
    {
        "refund_node": "refund_node",
        "tech_node": "tech_node",
        "general_node": "general_node",
    }
)

# End workflow after final nodes
graph.add_edge("refund_node", END)
graph.add_edge("tech_node", END)
graph.add_edge("general_node", END)

app = graph.compile()
✅ Step 7: Test Your LangGraph Workflow
queries = [
    "I want a refund for my purchase",
    "My app is crashing after update",
    "Can you explain your pricing plans?"
]

for q in queries:
    result = app.invoke({"user_query": q, "intent": None, "response": None})
    print("\nUSER:", q)
    print("INTENT:", result["intent"])
    print("RESPONSE:\n", result["response"])
✅ Expected Output Flow
✅ Input: “I want a refund”
Flow:
router_node → refund_node → END
✅ Input: “App is crashing”
Flow:
router_node → tech_node → END
✅ Input: “Pricing plans?”
Flow:
router_node → general_node → END
✅ What You Learned (Beginner Summary)
By completing this LangGraph beginner tutorial, you now know:
✅ How to create a LangGraph workflow
✅ How to connect multiple nodes
✅ How conditional edges work
✅ How to use Gemini in each node
✅ How routing creates smart workflows
Source Code
Please visit here to get source code LangGraph Tutorial with Gemini for Beginner .ipynb
See Also
Code is for execution, not just conversation. I focus on building software that is as efficient as it is logical. At Ganforcode, I deconstruct complex stacks into clean, scalable solutions for developers who care about stability. While others ship bugs, I document the path to 100% uptime and zero-error logic
2 thoughts on “LangGraph Tutorial with Gemini for Beginner 🚀”